Port Forwarding on Optus 4G B525 router
The port forwarding or "Virtual Server" settings are not available in the Optus customised web UI.
However the underlying XML based API of the router still supports the function, at least for my B525s 65a model.
So I've documented a couple of ways you can interact with the router API and set up port forwarding.
For those with scripting or programming experience
Option 2 - Use Chrome and the Servistate plugin to interact with the B525's API directly
I'm assuming you already have a python environment set up, so I won't go through that.
Here's the sample code to call.
If there is an error you will receive a message with an error code, and an optional message. e.g.
If you can now see your settings then that's it, congrats! you have now set up port forwarding.
-


5. Create a new project in ServiState
 6. Add the requests we will work with to the project:

2. Login with the admin username and password
3. While on the Web UI tab, click on the Servistate icon again in Chrome (from Step 1)
4. Click on the virtual-servers GET request, the second on the list above
5. Click on the [Send] button. You should see the following.

To setup port forwarding we will be changing the <servers>details, the <virtualserverexceludeports> will remain unchanged.
1. Create your XML to configure the port forwards
However the underlying XML based API of the router still supports the function, at least for my B525s 65a model.
So I've documented a couple of ways you can interact with the router API and set up port forwarding.
Important!: Port forwarding will only work when the other device can access the private 10.*.*.* Optus IP Address of the router. I use it so my Optus mobile can access my home network.
If you wanted to expose a service to the general internet then this likely won't work.
Option 1 - Use the python API I've developed at https://github.com/jinxo13/HuaweiB525RouterIf you wanted to expose a service to the general internet then this likely won't work.
For those with scripting or programming experience
Option 2 - Use Chrome and the Servistate plugin to interact with the B525's API directly
I've provided a step by step guide - no programming experience is required
Option 1 - Use the Python API
Step 1 - Check the current settings
It's a good idea to check the current settings to make sure there are no unexpected existing settings, and that the API is available on your router in you are following these steps for a different model.- Access to the router Web UI. e.g http://192.168.8.1
- Login to the Web UI
- Change the browser URL to: http://192.168.8.1/api/security/virtual-servers
- Right click on the page content and select "View the page source"
You should see the following:
To setup port forwarding we will be changing the <servers>details, the <virtualserverexceludeports> will remain unchanged.
<response>
   <servers />
   <virtualserverexcludeports>
      <excludeport>
         <virtual_server_special_ports>68, 1701, 10000</virtual_server_special_ports>
         <virtual_server_special_portintervals>50000-50020</virtual_server_special_portintervals>
      </excludeport>
   </virtualserverexcludeports>
</response>
To setup port forwarding we will be changing the <servers>
Step 2 - Setup and execute the python code
Grab a copy of the latest code from https://github.com/jinxo13/HuaweiB525RouterI'm assuming you already have a python environment set up, so I won't go through that.
Here's the sample code to call.
from router import B525Router
import xmlobjects

try:
  #Connect to the router
  router = B525Router(router='192.168.8.1', username='admin', password='xxx')

  #Set up port forwarding to an IPSEC VPN server
  config = xmlobjects.VirtualServers()
  config.addUdpService(name='IPSEC1',wanPort=500,lanPort=500,localIp='192.168.8.11')
  config.addUdpService(name='IPSEC2',wanPort=4500,lanPort=4500,localIp='192.168.8.11')
  response = router.setVirtualServer(config)

  #Logout
  response = router.logout()
except (RouterError, err):
  #Likely a login or session issue
  print('An unexpected error occurred: Code: %s, Message: %s' % (err.code, err.message))
This sets up a UDP port forward for ports 500 and 4500 to the internal server 192.168.8.11. I have a Raspberry Pi running an IPSEC VPN server at this address.
The code sets up a configuration object and then pass this to the Python API. The Python API converts the config to the appropriate XML and submits it to the underlying routers API. It then returns a response.
The VirtualServers configuration has a number of methods:
The first sets up UDP port forwarding, the next TCP port forwarding, the last allows both UDP and TCP for the specified ports. The parameters for the addXxxService are (in order):
The addXxxServices allows forwarding a port range instead of just a single port. The wanPort and lanPort parameters above are expanded to:
The code sets up a configuration object and then pass this to the Python API. The Python API converts the config to the appropriate XML and submits it to the underlying routers API. It then returns a response.
The VirtualServers configuration has a number of methods:
- addUdpService / addUdpServices
- addTcpService / addTcpServices
- addBothService / addBothServices
The first sets up UDP port forwarding, the next TCP port forwarding, the last allows both UDP and TCP for the specified ports. The parameters for the addXxxService are (in order):
- name - A unique name for the forward - I choose IPSECx to reflect the service
- wanPort - The WAN port to receive the service on
- lanPort - The LAN port the internal server hosts the service on
- localIp - The IP address of the internal server
The addXxxServices allows forwarding a port range instead of just a single port. The wanPort and lanPort parameters above are expanded to:
- startWanPort
- endWanPort
- startLanPort
- endLanPort
<response>OK</response>
If there is an error you will receive a message with an error code, and an optional message. e.g.
<error>
<code>125002</code>
<message>Invalid session</message>
</error>
-
Step 3 - Check the new settings
If you repeat Step 1 you should now see the following:<response>
<Servers>
<Server>
   <VirtualServerIPName>IPSEC1</VirtualServerIPName>
   <VirtualServerIPAddress>192.168.8.11</VirtualServerIPAddress>
   <VirtualServerLanEndPort>500</VirtualServerLanEndPort>
   <VirtualServerRemoteIP/>
   <VirtualServerStatus>1</VirtualServerStatus>
   <VirtualServerProtocol>17</VirtualServerProtocol>
   <VirtualServerWanPort>500</VirtualServerWanPort>
   <VirtualServerLanPort>500</VirtualServerLanPort>
   <VirtualServerWanEndPort>500</VirtualServerWanEndPort>
</Server>
<Server>
<VirtualServerIPName>IPSEC2</VirtualServerIPName>
<VirtualServerIPAddress>192.168.8.11</VirtualServerIPAddress>
<VirtualServerLanEndPort>4500</VirtualServerLanEndPort>
<VirtualServerRemoteIP/>
<VirtualServerStatus>1</VirtualServerStatus>
<VirtualServerProtocol>17</VirtualServerProtocol>
<VirtualServerWanPort>4500</VirtualServerWanPort>
<VirtualServerLanPort>4500</VirtualServerLanPort>
<VirtualServerWanEndPort>4500</VirtualServerWanEndPort>
</Server>
</Servers>
<virtualserverexcludeports>
<excludeport>
<virtual_server_special_ports>68, 1701, 10000</virtual_server_special_ports>
<virtual_server_special_portintervals>50000-50020</virtual_server_special_portintervals>
</excludeport>
</virtualserverexcludeports>
</response>
If you can now see your settings then that's it, congrats! you have now set up port forwarding.
-
Option 2 - Using Chrome
Step 1 - Setup the Servistate plugin and the APIs we will work with
1. Open Chrome and go to the URL: chrome://extensions/
2. Search for "servistate" (without the quotes). e.g.

3. Install this plugin
4. Click on the Servistate icon which should now be available


- a GET request for http://192.168.8.1/api/webserver/token
- a GET request for http://192.168.8.1/api/security/virtual-servers
- a POST request for http://192.168.8.1/api/security/virtual-servers
You should end up with the following:

Step 2 - Check the current port forwarding settings
1. In Chrome access the B525 router Web UI. http://192.168.8.12. Login with the admin username and password
Important!: Don't close this tab, you'll need it again
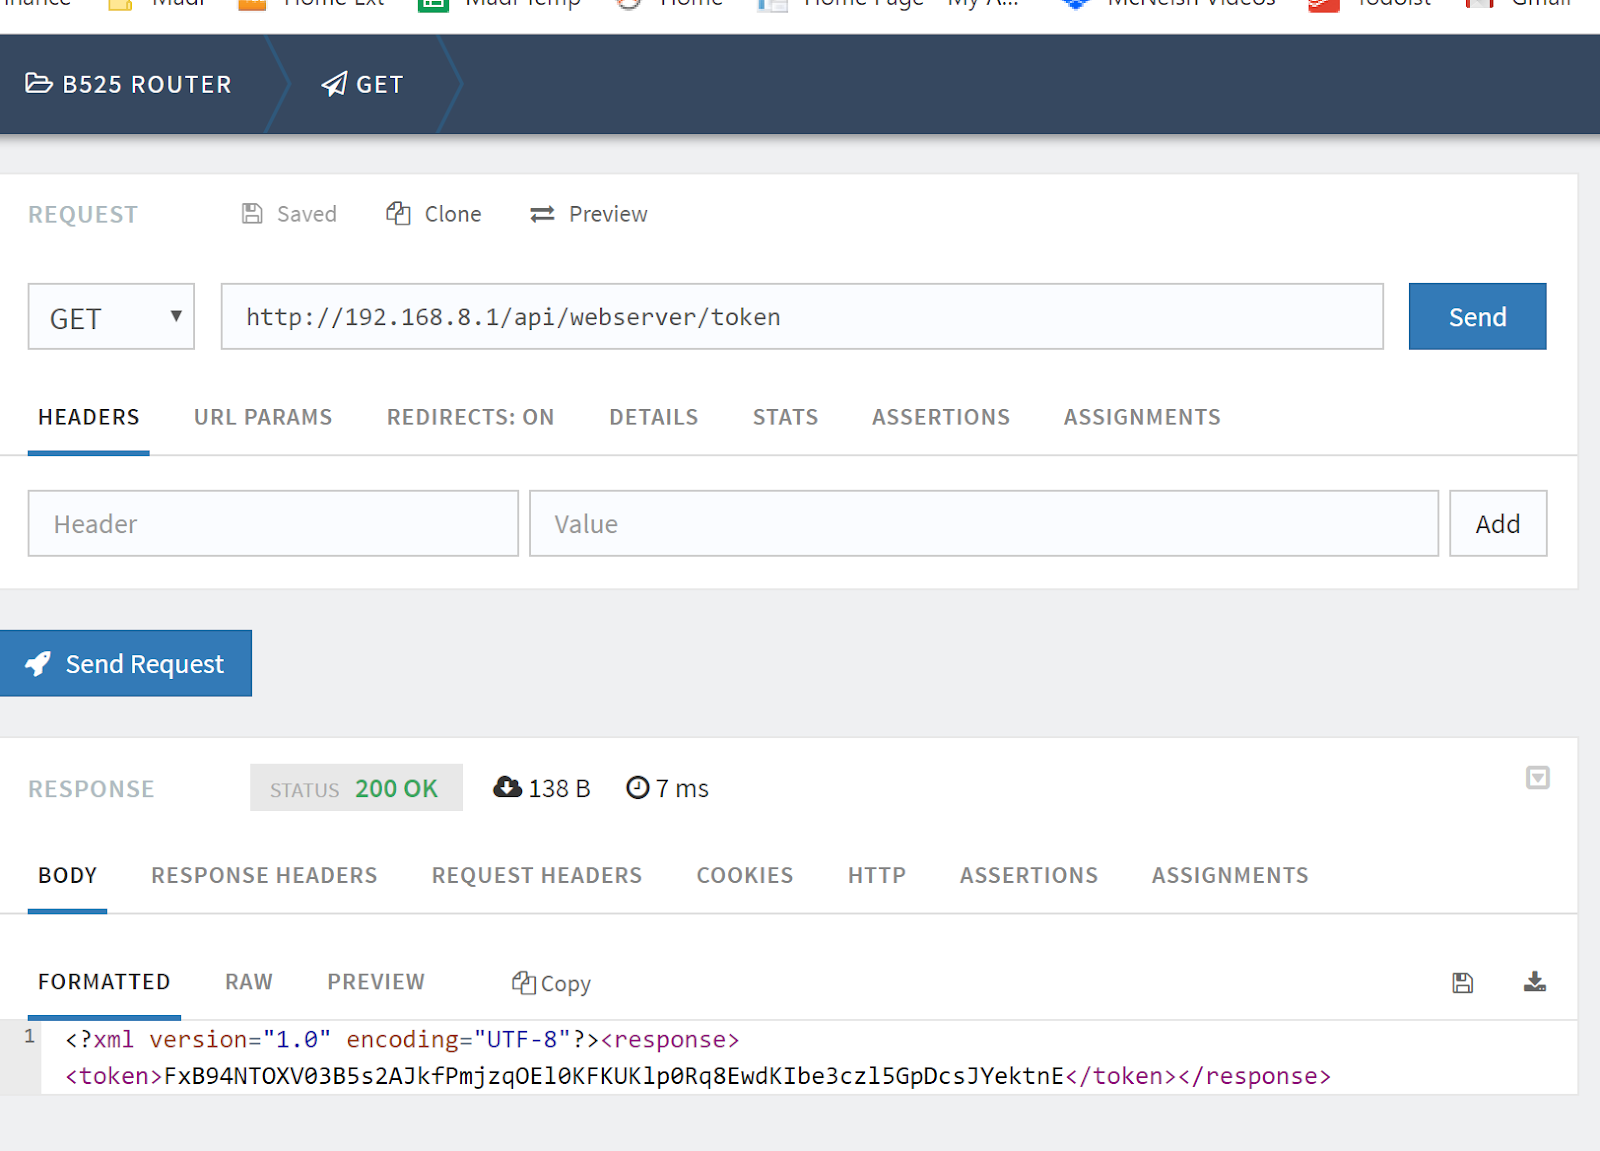
3. While on the Web UI tab, click on the Servistate icon again in Chrome (from Step 1)
4. Click on the virtual-servers GET request, the second on the list above
5. Click on the [Send] button. You should see the following.

Hint! If you get a 100003 error it's likely you've been logged out of the Web UI. Login again on the Web UI tab.
The formatted body is the XML response from the API. Which is:<response>
<Servers />
<virtualserverexcludeports>
<excludeport>
<virtual_server_special_ports>68, 1701, 10000</virtual_server_special_ports>
<virtual_server_special_portintervals>50000-50020</virtual_server_special_portintervals>
</excludeport>
</virtualserverexcludeports>
</response>
To setup port forwarding we will be changing the <servers>
If there is any setting already in the XML section you may want to make a note of it. As when we change the settings any existing port forwards will be lost.
Step 3 - Configure the port forwards
We need to submit some XML to the VirtualServer API.
The XML needs to be in the following format.
The valid protocols are (UDP is shown below):
- 17 = UDP
- 6 = TCP
- 0 = Both UDP and TCP
You will need to repeat the server element for another port or port range.
<Server> <VirtualServerIPName>IPSEC1</VirtualServerIPName> <VirtualServerIPAddress>192.168.8.11</VirtualServerIPAddress> <VirtualServerLanEndPort>500</VirtualServerLanEndPort> <VirtualServerRemoteIP/> <VirtualServerStatus>1</VirtualServerStatus> <VirtualServerProtocol>17</VirtualServerProtocol> <VirtualServerWanPort>500</VirtualServerWanPort> <VirtualServerLanPort>500</VirtualServerLanPort> <VirtualServerWanEndPort>500</VirtualServerWanEndPort> </Server>
1. Create your XML to configure the port forwards
- VirtualServerIPName= A custom name, it should be unique for each server entry
- VirtualServerIPAddress= Local servers LAN IP address
- VirtualServerLanPort= The start of the local port range to expose
- VirtualServerLanEndPort= The end of the local port range to expose
- VirtualServerWanPort= The start of the WAN port to make available
- VirtualServerWanEndPort= The end of the WAN port to make available
- VirtualServerRemoteIP= Not required
- VirtualServerProtocol= 0, 6 or 17 - Meaning Both, TCP or UDP
- VirtualServerStatus= 1 is enabled, 0 is disabled
Just try a single one first to make sure it works then you can get more complicated.
2. Login again to the Web UI, it's likely automatically logged you out
3. Run the GET api/webserver/token request
Copy the returned token into a test editor (notepad++.exe rocks for Windows)


If you can now see your settings then that's it, congrats! you have now set up port forwarding.
4. Go into the POST request and configure it
- Paste your XML into the "RAW" input section
- Add a Header parameter named __RequestVerificationToken
- Enter the last 32 characters of the token you saved earlier as the value
- Click Send
Step 4 - Check the response and deal with any errors
All going well you will see <response>OK</response> as shown below

Hint!
If you see a 100003 error try logging into the Web UI again.
If you get an 100006 check your XML is correct structured (well formed).
For the POST (sending data to the API) to be successful you must have:
If you see a 100003 error try logging into the Web UI again.
If you get an 100006 check your XML is correct structured (well formed).
For the POST (sending data to the API) to be successful you must have:
- A valid session, the Tab which is logged into the Web UI as admin provides this
- A valid token - which I believe must be unique for each request. The call to /api/webserver/token provides this.
Step 5 - Check the settings have been applied
1. Run the GET /api/security/virtual-servers request in Servistate again
This time the response should include the settings you sent. e.g.
<response>
   <Servers>
      <Server>
         <VirtualServerIPName>IPSEC1</VirtualServerIPName>
         <VirtualServerIPAddress>192.168.8.11</VirtualServerIPAddress>
         <VirtualServerLanEndPort>500</VirtualServerLanEndPort>
         <VirtualServerRemoteIP/>
         <VirtualServerStatus>1</VirtualServerStatus>
         <VirtualServerProtocol>17</VirtualServerProtocol>
         <VirtualServerWanPort>500</VirtualServerWanPort>
         <VirtualServerLanPort>500</VirtualServerLanPort>
         <VirtualServerWanEndPort>500</VirtualServerWanEndPort>
      </Server>
   </Servers>
   <virtualserverexcludeports>
      <excludeport>
         <virtual_server_special_ports>68, 1701, 10000</virtual_server_special_ports>
         <virtual_server_special_portintervals>50000-50020</virtual_server_special_portintervals>
      </excludeport>
   </virtualserverexcludeports>
</response>
If you can now see your settings then that's it, congrats! you have now set up port forwarding.


I get everything working (using the 2nd method) except the last step (Run the GET /api/security/virtual-servers) it still shows the original information from the first time. It is as if the sending of the custom XML did not save, even tho I get an OK response.
ReplyDeleteAny ideas?
Check the case of the XML in the request, as this is important.
DeleteI noticed my screenshot was all lowercase in the example which is wrong.
I've corrected this now.
It should be mostly camel case i.e. <VirtualServer...> not <virtualserver...>
Thanks mate will give this a go. I had it as upper case but changed it to lower case as your example had it as such. Didn't think to try the other way.
DeleteAlso just to confirm the port forward will only allow me to accept incoming connections from other Optus connections?
I've tried to login to do these comments but get an error each time. I have also sent you a whim on whirlpool
DeleteYes if you are with Optus then you will only be able to port forward for other optus devices. I use it to connect from my mobile to my home network via VPN.
DeleteSweet as so i just finished it all and now what do i do how do i link my optus modem ? Cheers for the guide
DeleteHi Bilyjoel,
DeleteYou need to run a VPN service in your home network and expose the ports.
You should then be able to connect from your mobile using a VPN connection to your public IP Address.
---
I'd note that I don't do this anymore, I now use a service like dataplicity.com for Raspberry PIs that allows you to connect to the PI bash shell, as well as create a tunnel (exposed as port 443 "https://" externally) allowing access to services running in your home network.
Cheers,
Hamish